OpenGL has been around a long time, and from reading all the accumulated layers of documentation out there on the Internet, it's not always clear what parts are historic and what parts are still useful and supported on modern graphics hardware. It's about time for a new OpenGL introduction that walks through the parts that are still relevant today.
Update: Join the Reddit discussion.
What is OpenGL?
Wikipedia gives a good overview of the purpose and history of OpenGL, but I'll give a quick summary here. In its modern form, OpenGL is a cross-platform library for interfacing with programmable GPUs for the purpose of rendering real-time 3d graphics. Its use is common in games, CAD, and data visualization applications. It started in the early '90s as a cross-platform standardization of SGI's proprietary GL ("Graphics Library") that drove the graphics hardware in their high-end workstations. A few years later, GLQuake and 3dfx's Voodoo graphics accelerators pushed 3d accelerators into the mainstream, and OpenGL became a standard alongside Microsoft's proprietary Direct3d library for controlling graphics accelerators in consumer PCs. In recent years, the Khronos group has taken stewardship of the OpenGL standard, updating it to support the features of modern programmable GPUs, pushing it into the mobile and online domains with OpenGL ES and WebGL, and streamlining it in OpenGL 3 by deprecating the outdated features that cluttered earlier versions of the library.
Another recent development has been the adoption of general purpose GPU (GPGPU) libraries, including nVidia's CUDA and Khronos' OpenCL. These libraries implement dialects of C with added data parallelism features, allowing the GPU to be used for general computation without having to work within the graphics-oriented framework of OpenGL. However, these GPGPU frameworks don't replace OpenGL; since their primary purpose is not graphics programming, they only provide access to a GPU's computation units, ignoring its graphics-specific hardware. They can, however, act as accessories to OpenGL. CUDA and OpenCL both can share buffers of GPU memory with OpenGL and pass data between GPGPU programs and the graphics pipeline. GPGPU will be outside the scope of these articles; I'll be focusing on using OpenGL for graphics tasks.
For these tutorials, I'm going to assume you're already a programmer and that you know C, but that you haven't necessarily seen OpenGL or done graphics programming before. Knowing at least some basic algebra and geometry will help a lot. I'm going to cover OpenGL 2.0, and avoid discussing any API features that are deprecated or removed in OpenGL 3 or OpenGL ES. If I write enough chapters, I might talk about some of the new features of OpenGL 3 and 4 after I go through the basics. In addition to OpenGL, I'll be using two helper libraries: GLUT (the GL Utility Toolkit), which provides a cross-platform interface between the window system and OpenGL, and GLEW (the GL Extensions Wrangler), which streamlines dealing with different versions of OpenGL and their extensions.
Where do I get OpenGL, GLUT, and GLEW?
OpenGL comes standard in some form or another on MacOS X, Windows, and most Linux distributions. If you want to follow these tutorials, you'll need to ensure your OpenGL implementation supports at least version 2.0. MacOS X's OpenGL implementation always supports OpenGL 2.0, at least in software if the graphics card driver doesn't provide it. On Windows, you're dependent on your graphics card drivers to provide OpenGL 2 or later. You can use RealTech's free OpenGL Extensions Viewer to see what OpenGL version your driver supports. nVidia and AMD's OpenGL drivers support at least OpenGL 2.0 on all of their video cards released in the past four years. Users of Intel onboard graphics and older graphics cards are less fortunate. For a fallback, Mesa provides an open-source, cross-platform software OpenGL 2.1 implementation that works on Windows and almost all Unix platforms.
Mesa is also the most common OpenGL implementation on Linux, where it also works with the X server to interface OpenGL with graphics hardware using "direct rendering interface" (DRI) drivers. You can see whether your particular DRI driver supports OpenGL 2.0 by running the glxinfo command from an xterm. If OpenGL 2.0 isn't supported on your hardware, you can disable the driver to fall back to Mesa's software implementation. nVidia also provides their own proprietary OpenGL implementation for Linux targeting their own GPUs; this implementation should provide OpenGL 2.0 or later on any recent nVidia card.
To install GLUT and GLEW, look for the binary packages on their respective sites. MacOS X comes with GLUT preinstalled. Most Linux distributions have GLUT and GLEW available through their package system, though for GLUT, you may need to enable your distribution's optional "non-free" package repositories, since its license is not technically open source. There is an open-source GLUT clone called OpenGLUT if you're a stickler for such things.
If you're a seasoned C programmer, you should be able to install these libraries and get them working in your development environment without any trouble. But before we get our hands dirty with any code, I'm going to go over some big-picture concepts. In this first chapter, I'm going to explain the graphics pipeline and the dataflow of a rendering job. In the next chapter, we'll write a simple "hello world" program that draws the contents of an image file to the screen, showing how the pipeline is put into practice.
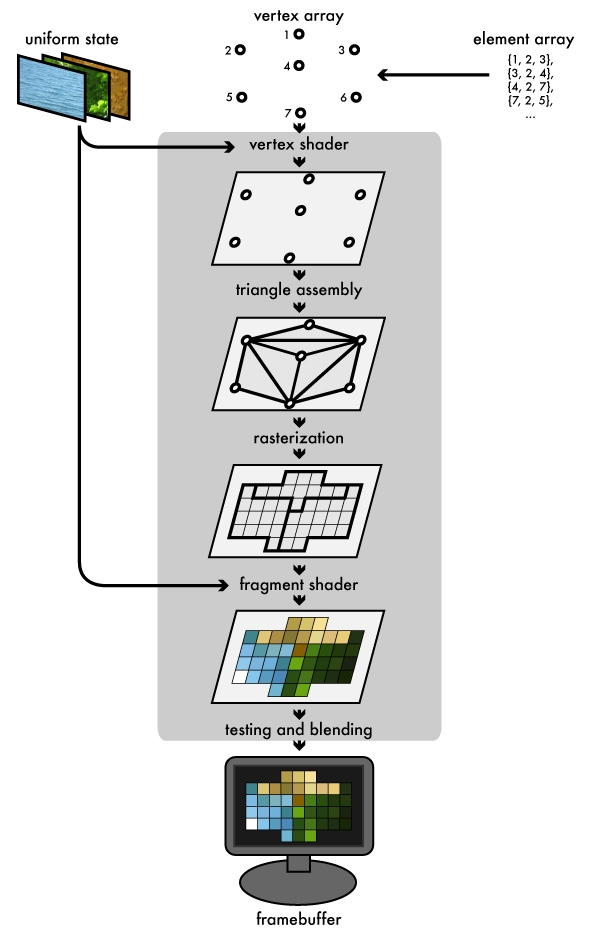
Ever since the early days of real-time 3d, the triangle has been the paintbrush with which scenes have been drawn. Although modern GPUs can perform all sorts of flashy effects to cover up this dirty secret, underneath all the shading, triangles are still the medium in which they work. The graphics pipeline that OpenGL implements reflects this: the host program fills OpenGL-managed memory buffers with arrays of vertices; these vertices are projected into screen space, assembled into triangles, and rasterized into pixel-sized fragments; finally, the fragments are assigned color values and drawn to the framebuffer. Modern GPUs get their flexibility by delegating the "project into screen space" and "assign color values" stages to uploadable programs called shaders. Let's look at each stage in more detail:
The vertex and element arrays
A rendering job starts its journey through the pipeline in a set of one or more vertex buffers, which are filled with arrays of vertex attributes. These attributes are used as inputs to the vertex shader. Common vertex attributes include the location of the vertex in 3d space, and one or more sets of texture coordinates that map the vertex to a sample point on one or more textures. The set of vertex buffers supplying data to a rendering job are collectively called the vertex array. When a render job is submitted, we supply an additional element array, an array of indexes into the vertex array that select which vertices get fed into the pipeline. The order of the indexes also controls how the vertices get assembled into triangles later on.
Uniform state and textures
A rendering job also has uniform state, which provides a set of shared, read-only values to the shaders at each programmable stage of the pipeline. This allows the shader program to take parameters that don't change between vertices or fragments. The uniform state includes textures, which are one-, two-, or three-dimensional arrays that can be sampled by shaders. As their name implies, textures are commonly used to map texture images onto surfaces. They can also be used as lookup tables for precalculated functions or as datasets for various kinds of effects.
The vertex shader
The GPU begins by reading each selected vertex out of the vertex array and running it through the vertex shader, a program that takes a set of vertex attributes as inputs and outputs a new set of attributes, referred to as varying values, that get fed to the rasterizer. At a minimum, the vertex shader calculates the projected position of the vertex in screen space. The vertex shader can also generate other varying outputs, such as a color or texture coordinates, for the rasterizer to blend across the surface of the triangles connecting the vertex.
Triangle assembly
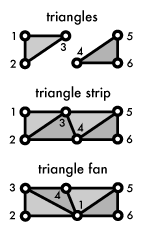
The GPU then connects the projected vertices to form triangles. It does this by taking the vertices in the order specified by the element array and grouping them into sets of three. The vertices can be grouped in a few different ways:
- Take every three elements as an independent triangle
- Make a triangle strip, reusing the last two vertices of each triangle as the first two vertices of the next
- Make a triangle fan, connecting the first element to every subsequent pair of elements
The diagram shows how the three different modes behave. Strips and fans both require only one new index per triangle in the element array after the initial three, trading the flexibility of independent triangles for extra memory efficiency in the element array.
Rasterization

The rasterizer takes each triangle, clips it and discards parts that are outside of the screen, and breaks the remaining visible parts into pixel-sized fragments. As mentioned above, the vertex shader's varying outputs are also interpolated across the rasterized surface of each triangle, assigning a smooth gradient of values to each fragment. For example, if the vertex shader assigns a color value to each vertex, the rasterizer will blend those colors across the pixelated surface as shown in the diagram.
The fragment shader
The generated fragments then pass through another program called the fragment shader. The fragment shader receives the varying values output by the vertex shader and interpolated by the rasterizer as inputs. It outputs color and depth values that then get drawn into the framebuffer. Common fragment shader operations include texture mapping and lighting. Since the fragment shader runs independently for every pixel drawn, it can perform the most sophisticated special effects; however, it is also the most performance-sensitive part of the graphics pipeline.
Framebuffers, testing, and blending
A framebuffer is the final destination for the rendering job's output. In addition to the default framebuffer OpenGL gives you to draw to the screen, most modern OpenGL implementations let you make framebuffer objects that draw into offscreen renderbuffers or into textures. Those textures can then be used as inputs to other rendering jobs. A framebuffer is more than a single 2d image; in addition to one or more color buffers, a framebuffer can have a depth buffer and/or stencil buffer, both of which optionally filter fragments before they are drawn to the framebuffer: Depth testing discards fragments from objects that are behind the ones already drawn, and stencil testing uses shapes drawn into the stencil buffer to constrain the drawable part of the framebuffer, "stencilling" the rendering job. Fragments that survive these two gauntlets have their color value alpha blended with the color value they're overwriting, and the final color, depth, and stencil values are drawn into the corresponding buffers.
Conclusion
That's the process, from vertex buffers to framebuffer, that your data goes through when you make a single "draw" call in OpenGL. Rendering a scene usually involves multiple draw jobs, switching out textures, other uniform state, or shaders between passes and using the framebuffer's depth and stencil buffers to combine the results of each pass. Now that we've covered the general dataflow of 3d rendering, we can write a simple program to see how OpenGL makes it all happen. Throughout the course of this tutorial, I'd love to —let me know if it's helping you or if anything doesn't make sense.