At this point in our "hello world" program, we've loaded our buffers and textures and compiled and linked our shader program. The pieces are all finally in place—let's render our image.
Overview of a rendering job
Rendering potentially takes a lot of parameters. In addition to all of the buffers, textures, shaders, and uniform parameters it may involve, there are dozens of miscellaneous settings I haven't touched on that control how a rendering job behaves. Rather than offer a monolithic "draw" function with all of these flags as arguments, or require you to fill out a struct with dozens of fields, OpenGL's approach is to lay all of these settings out as a state machine. When you bind objects to targets using glBindTexture, glBindBuffer, and their kin, you are not only making the objects available for modification, you are also binding them to the current rendering job's state. There are also state manipulation functions that set the current shader program, assign values to uniform parameters, and describe the structure of the vertex array. When you finally submit a job with glDrawElements, OpenGL takes a snapshot of the current state and adds it to the GPU's command queue, where it will be executed as soon as the GPU is available. Meanwhile, you can change the OpenGL state around and queue up additional jobs without waiting for your previous jobs to finish. Once you're done queueing up jobs, you tell the window system to "swap buffers", which will wait for all of the queued jobs to finish and then commit the result to the screen.
Let's start writing the code to set up our rendering job state:
Activating the shader program and assigning uniforms
static void render(void)
{
    glUseProgram(g_resources.program);
We begin by activating our shader program by passing the name of the linked program object to glUseProgram. Once the program is active, we can start assigning values to our uniform variables. If you recall from looking at our fragment shader source, we have the float fade_factor and an array of two sampler2Ds named textures to assign.
glUniform1f(g_resources.uniforms.fade_factor, g_resources.fade_factor);
OpenGL provides a family of glUniform* functions for assigning to uniform variables, with each member corresponding to a possible type for a uniform variable in a GLSL program. These functions all have names of the form glUniform{dim}{type}, where the dim indicates the size of a vector type (1 for an int or float uniform, 2 for a vec2, etc.), and the type indicates the component type: either i for integer, or f for floating-point. Our fade_factor uniform is a simple float, so we assign it by calling glUniform1f, passing in the uniform's location and new value as arguments.
    glActiveTexture(GL_TEXTURE0);
    glBindTexture(GL_TEXTURE_2D, g_resources.textures[0]);
    glUniform1i(g_resources.uniforms.textures[0], 0);

    glActiveTexture(GL_TEXTURE1);
    glBindTexture(GL_TEXTURE_2D, g_resources.textures[1]);
    glUniform1i(g_resources.uniforms.textures[1], 1);
Assigning textures to samplers is a bit more complicated. The GPU has a limited number of texture units that can supply texture data to any one rendering job. We have to bind our texture objects to these texture units, then assign the indexes of the texture units to our sampler uniform variables as if they were int variables. The GL_TEXTURE_* target name we bind to must also correspond to the type of the sampler uniform. In our case, GL_TEXTURE_2D corresponds to the sampler2D type of our textures variable. glActiveTexture sets the active texture unit. glBindTexture takes the active texture unit as an implicit parameter, binding the given texture object to the target on that unit. (Other texture object manipulation functions like glTexParameteri and glTexImage2D also operate on the texture bound to the active texture unit.) Once we've bound the texture unit, we can assign its index to the uniform using glUniform1i.
Setting up the vertex array
    glBindBuffer(GL_ARRAY_BUFFER, g_resources.vertex_buffer);
    glVertexAttribPointer(
        g_resources.attributes.position,  /* attribute */
        2,                                /* size */
        GL_FLOAT,                         /* type */
        GL_FALSE,                         /* normalized? */
        sizeof(GLfloat)*2,                /* stride */
        (void*)0                          /* array buffer offset */
    );
    glEnableVertexAttribArray(g_resources.attributes.position);
Next, we tell OpenGL the format of our vertex array. We do this by going through each vertex attribute and calling glVertexAttribPointer, which associates a part of a vertex buffer with the attribute, and glEnableVertexAttribArray, which tells OpenGL to read values for that attribute from the vertex array while rendering. glVertexAttribPointer takes as arguments the attribute location, the size and component type of the associated attribute variable (for our position attribute, size 2 and type GL_FLOAT), the number of bytes between attribute values (called the stride), and the offset of the first attribute value inside the currently bound GL_ARRAY_BUFFER. For historic reasons, the offset is passed as a pointer, but the parameter is used for its integer value, so we pass an integer cast to void*.
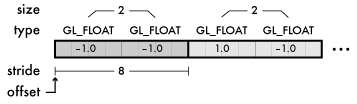
In our case, our vertex array consists only of the single vec2 position attribute; if we had multiple attributes, the attributes' values could be either interleaved, like an array of structs, or kept in separate arrays. The flexibility glVertexAttribPointer gives in letting us choose the stride and offset of each attribute can accommodate either arrangement. Different attributes can even be potentially read from separate buffer objects; changing the GL_ARRAY_BUFFER binding won't affect the buffer used by attribute array pointers that have already been set.
(The normalized? argument I skipped mentioning above is used with arrays of integers in the vertex array. If true, the components will be mapped from the range of their integer type, such as 0–255 for an unsigned byte, to the floating-point range 0.0–1.0, like color components in an image. If false, their integer values will be preserved. For components like ours that are already floating-point, it doesn't have any effect.)
Submitting the rendering job
    glBindBuffer(GL_ELEMENT_ARRAY_BUFFER, g_resources.element_buffer);
    glDrawElements(
        GL_TRIANGLE_STRIP,  /* mode */
        4,                  /* count */
        GL_UNSIGNED_SHORT,  /* type */
        (void*)0            /* element array buffer offset */
    );
glDrawElements is the function that sets the graphics pipeline in motion. We tell it what triangle assembly mode we want, how many vertices to assemble triangles from, the type of the components of our element array, and the offset within the currently bound GL_ELEMENT_ARRAY_BUFFER of the first component to render, again as a fake-pointer-but-really-integer. It will then take the pointed-to element array indexes, gather them up with the currently bound shader program, uniform values, texture units, and vertex attribute pointers we just set up, bundle everything into a rendering job, and place the job in the GPU's queue.
Cleaning up after ourselves
glDisableVertexAttribArray(g_resources.attributes.position);
"Always leave things the way you found them," the late Bill Brasky once advised. A downside of OpenGL's state machine model is that all of these bindings and settings persist globally, even after glDrawElements is called. This means that we have to take some care with how our OpenGL code will interact with all of the other OpenGL code throughout the program. While there is no other OpenGL code yet in this program to interact with, we should still start learning good habits. Particular care is needed with vertex attributes: In a complex program involving multiple shader programs and multiple vertex arrays, an incorrectly enabled vertex attribute array could potentially cause glDrawElements to try to feed the GPU invalid data, leading to corrupted output or segfaults. It's a good idea to keep a vertex array attribute enabled only as long as it's needed. Here, we disable the vertex attribute array for position.
You might also be thinking, we're rebinding all of the same objects, setting all of the same uniform values (aside from the fade_factor), and reactivating all of the same vertex attributes every time we render. If the state settings persist across glDrawElements calls, we could technically do without almost all of this per-frame setup, getting away with binding everything once before entering glutMainLoop and having render only update the fade factor and call glDrawElements. But again, it's a good idea to set up all the state you expect at the point you expect it. Depending on bits of OpenGL state to remain unchanged between frames is an easy way to breed bugs as your programs grow.
Displaying our finished scene
    glutSwapBuffers();
}
We only have the one rendering job to wait on, so now that we've submitted the job and tidied up, we can sync immediately. The GLUT function glutSwapBuffers waits for all running jobs to finish, then swaps the color buffers of our double-buffered framebuffer, moving the currently visible buffer to the "back" to be rendered into by the next frame, and pushing the image we just rendered to the "front", showing the newly-rendered scene in our window. Our rendering is done!
Animating the scene
static void update_fade_factor(void)
{
    int milliseconds = glutGet(GLUT_ELAPSED_TIME);
    g_resources.fade_factor = sinf((float)milliseconds * 0.001f) * 0.5f + 0.5f;
    glutPostRedisplay();
}
To keep the image moving, our glutIdleFunc callback continuously updates the value we assign to the fade_factor uniform. GLUT maintains a millisecond timer we can access with glutGet(GLUT_ELAPSED_TIME); we just feed this through the standard C sinf function to get a smooth, periodic fade from zero to one and back. Every time we update the fade factor, we call glutPostRedisplay, which forces our render callback to get invoked again, updating the window.
Compiling and running the program, again
It's finally time to compile and run the whole program with all of our new code. The command to build the executable will look much as it did last time when we built the dummied-out version, but this time, you'll build from the real hello-gl.c and util.c source files. If you use the Makefiles, you can build with the default target:
make -f Makefile.MacOSX # or Makefile.Unix or Makefile.Mingw
nmake /f Nmakefile.Windows
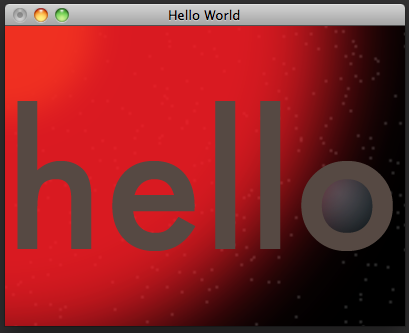
Once built, the program assumes that all its image and shader resources are in the current directory, so it will work best to run it from the command line from inside the directory containing the executable, the image files, and the shader source. We can finally bask in the glory of our hard work:
Conclusion
That was admittedly a long way to go for a simple "hello world". But the framework we've built up here is actually pretty flexible; you could swap in your own images and tweak the shaders to transform or filter the images further before sampling them, all without recompiling the C. In the next chapter, we'll mess around with the vertex shader to demonstrate the basics of 3d transformation and projection.
If you're interested in breaking off on your own at this point and looking over the OpenGL specifications yourself, note that the OpenGL 2 specs still include all of the deprecated features I've been avoiding discussing. I would highly recommend looking instead at the spec for OpenGL 3.1 or later, being sure to look at the "core profile" specs rather than the ones for the "compatibility profiles". While OpenGL 3 and later add a lot of new features over OpenGL 2, all of the basic APIs I've gone over here for OpenGL 2 still form the basis for newer versions.
OpenGL ES 2 is also worth looking at. It consists mostly of the forward-looking subset of OpenGL 2 I've been covering; all of the OpenGL APIs I've mentioned are present in OpenGL ES 2 as well. OpenGL ES also adds additional features for mobile platforms, such as fixed-point numeric support and offline shader compilation, that the desktop version of the spec doesn't offer. If you want to try your hand at OpenGL ES development, it is part of the Android NDK and iPhone SDKs, among other mobile development platforms. On Windows, Google's ANGLE project also provides an implementation of OpenGL ES 2 built on top of DirectX.
Hopefully this chapter has given you a good taste of the OpenGL API and GLSL language. As always, if you felt something I touched on bears clarification, or there's something in particular you'd like to see me cover, .